> ## Documentation Index
> Fetch the complete documentation index at: https://utter.to/docs/llms.txt
> Use this file to discover all available pages before exploring further.
# Use Utter Locally
> Set up Utter for 100% free, unlimited local transcription and AI processing
For 100% free, unlimited usage, use a Parakeet transcription model and Apple Intelligence for AI processing.
This guide shows how to keep transcription on your device and avoid usage-based API costs. Parakeet handles voice-to-text locally, while Apple Intelligence handles simple cleanup, short summaries, and lightweight writing help.
## Overview
Use Utter locally in two stages to avoid paid transcription or AI usage:
1. **Local transcription**: Choose an on-device speech model (Parakeet) for voice-to-text.
2. **Free AI processing**: Choose Apple Intelligence as your default AI model.
**What you get:** Unlimited dictation, no per-minute transcription fees, and no AI API key required.
## Stage 1: Use Local Transcription Models
To make transcription fully local, switch the default transcription model to a Parakeet model.
In Utter, go to **Settings > Advanced**.
At the top of **Default Models**, select a **Parakeet** model for **Transcription**. Built-in models are marked with a **MacBook icon** in the model list.
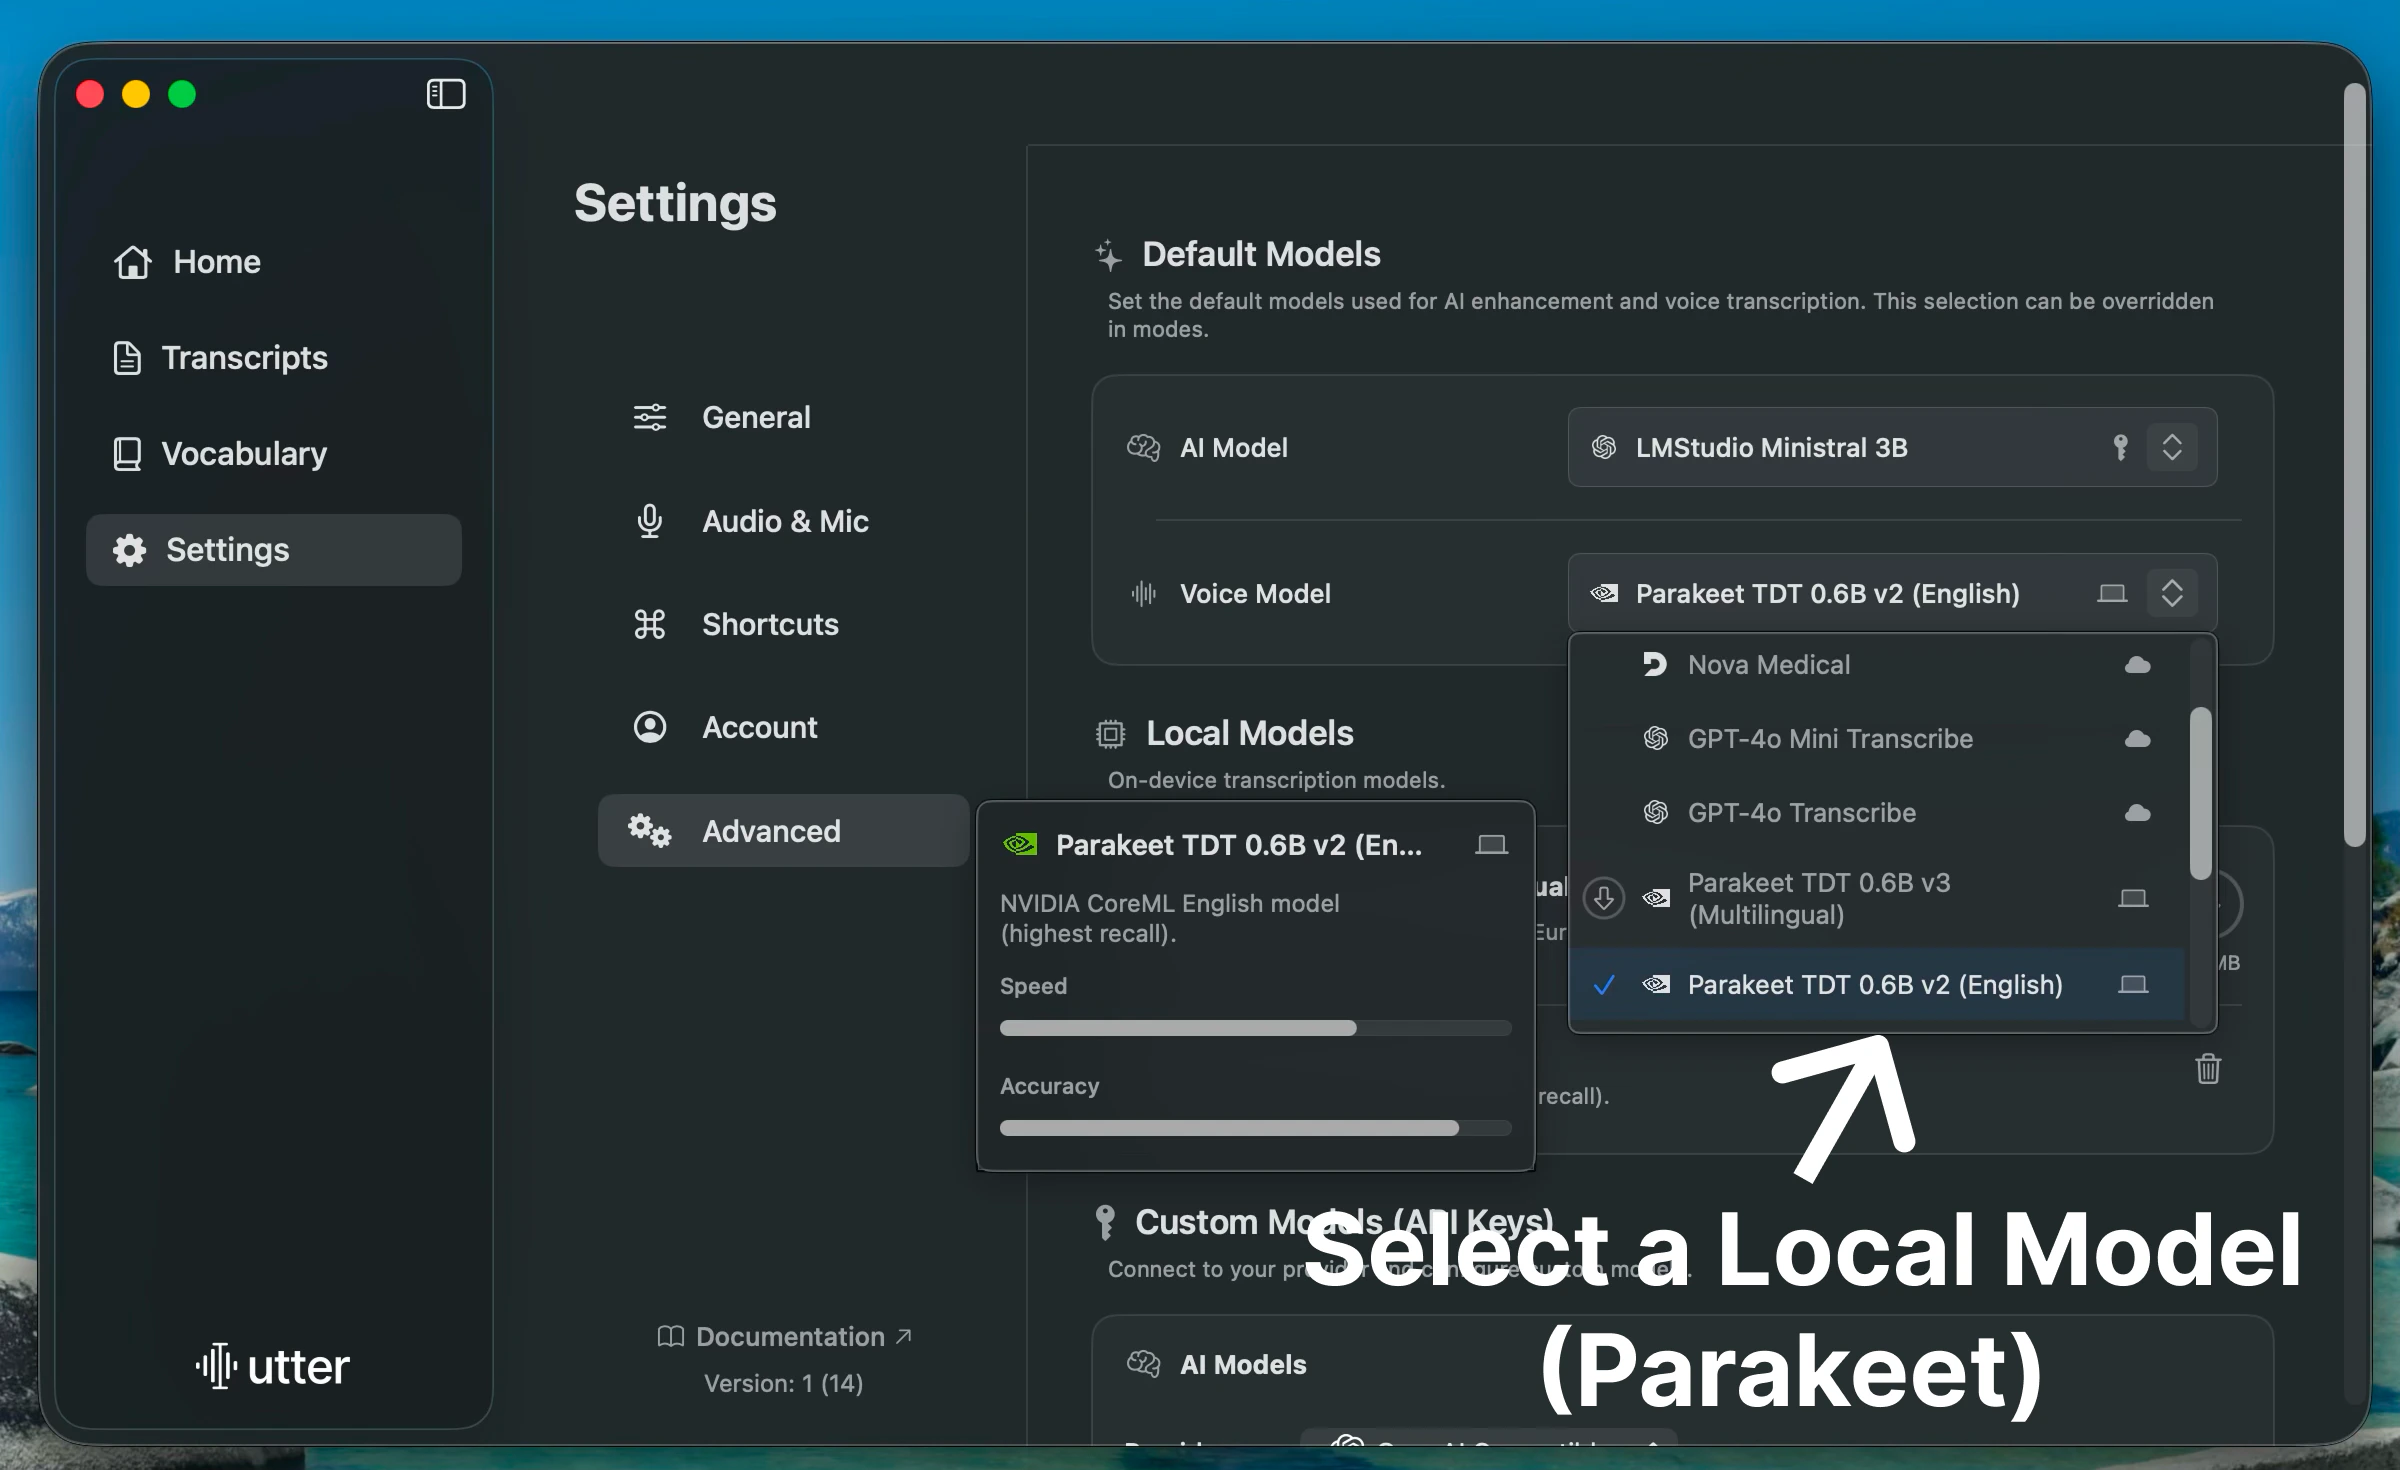 Selecting a Parakeet model automatically downloads it. Once downloaded, all transcription runs locally on your device.
**What to expect:** New recordings use the Parakeet model, continue working without internet for transcription, and do not use paid transcription minutes.
When a Parakeet model is selected, transcription stays on-device, requires no internet, and remains private.
## Stage 2: Use Apple Intelligence for AI Processing
Apple Intelligence is the recommended local AI model for most users. It works well for simple cleanup, short summaries, and lightweight writing help.
Apple Intelligence requires a Mac with Apple silicon, macOS Sequoia 15.1 or later, supported device and Siri languages, and about 7 GB of available storage. Turn it on in **System Settings > Apple Intelligence & Siri** before selecting it in Utter.
In Utter, go to **Settings > Advanced**.
In **Models**, open the **AI model** picker and select **Apple Intelligence**.
Selecting a Parakeet model automatically downloads it. Once downloaded, all transcription runs locally on your device.
**What to expect:** New recordings use the Parakeet model, continue working without internet for transcription, and do not use paid transcription minutes.
When a Parakeet model is selected, transcription stays on-device, requires no internet, and remains private.
## Stage 2: Use Apple Intelligence for AI Processing
Apple Intelligence is the recommended local AI model for most users. It works well for simple cleanup, short summaries, and lightweight writing help.
Apple Intelligence requires a Mac with Apple silicon, macOS Sequoia 15.1 or later, supported device and Siri languages, and about 7 GB of available storage. Turn it on in **System Settings > Apple Intelligence & Siri** before selecting it in Utter.
In Utter, go to **Settings > Advanced**.
In **Models**, open the **AI model** picker and select **Apple Intelligence**.
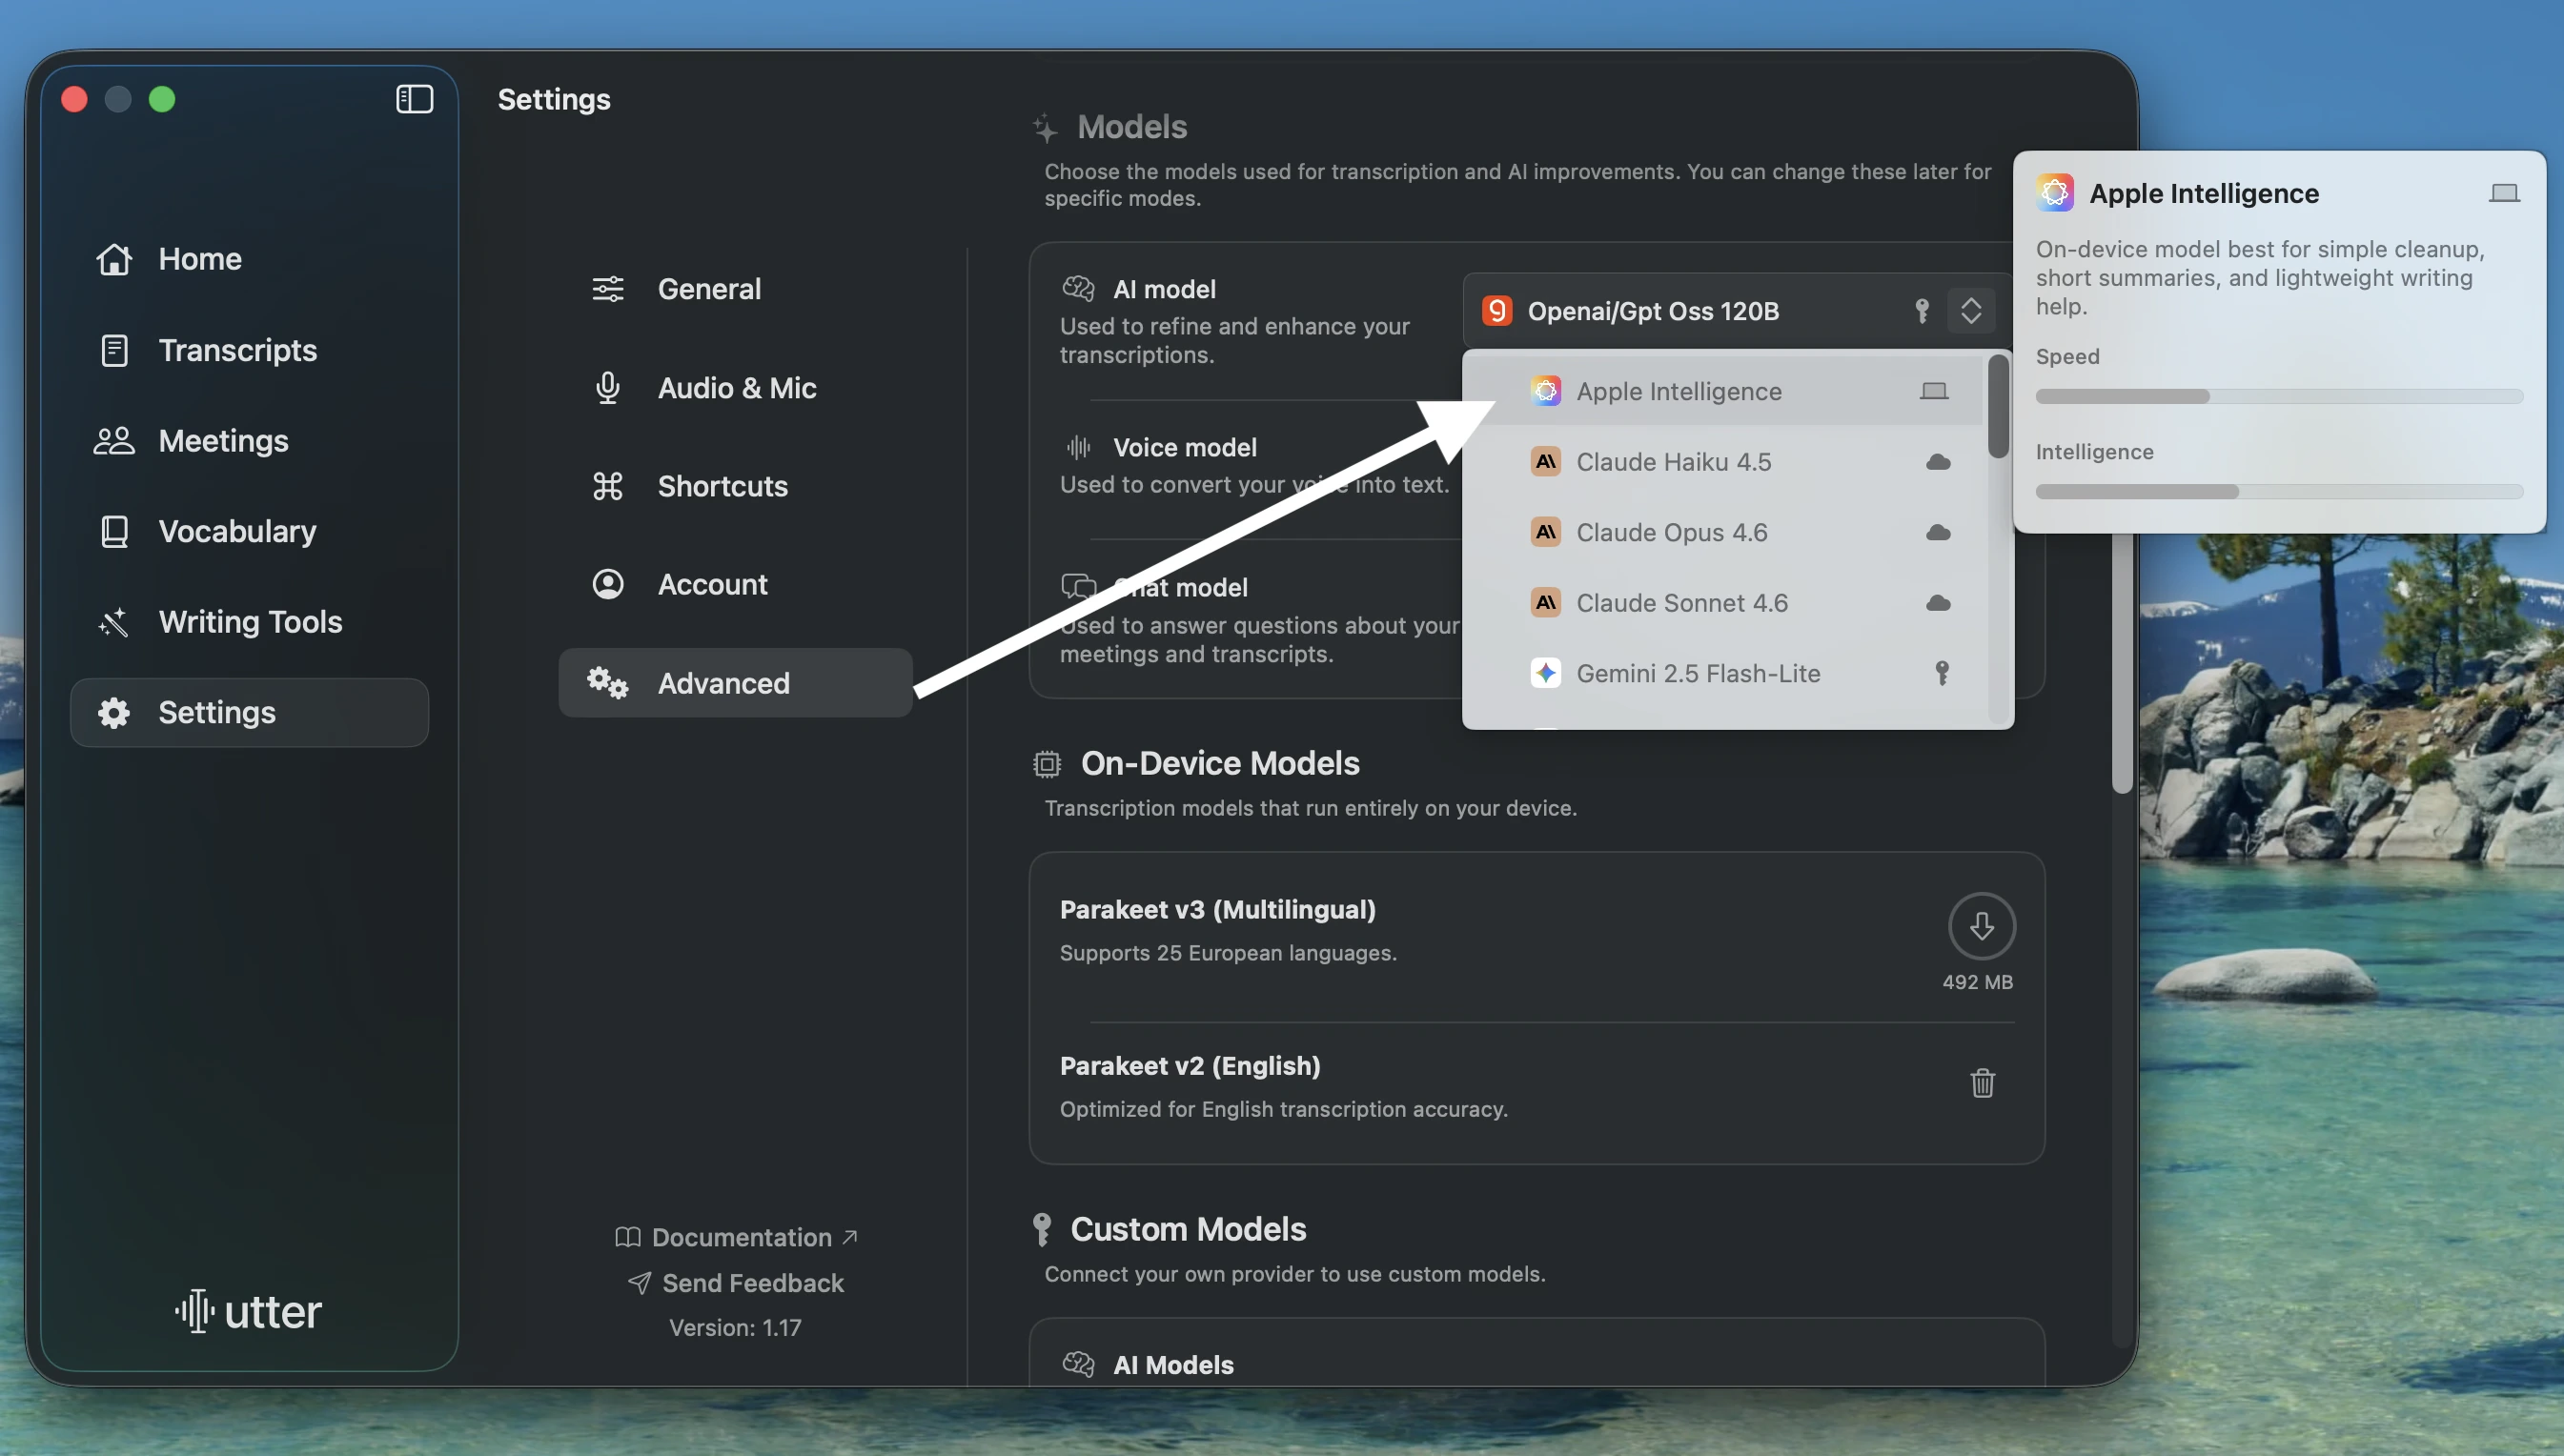 Record a short sentence, then use a mode that applies AI processing, such as cleanup, summary, or writing help.
**What to expect:** New AI improvements use Apple Intelligence, so no paid AI API key is required. Apple Intelligence runs many requests on-device and can use Private Cloud Compute for more complex requests.
**If that did not work:** Check that Apple Intelligence is turned on in **System Settings > Apple Intelligence & Siri**, confirm your Mac and language are supported, then restart Utter and select **Apple Intelligence** again.
Apple Intelligence is the fastest setup because it does not require installing LM Studio, Ollama, or a separate local server.
## Advanced Fallback: Use LM Studio or Ollama
Use this path only if Apple Intelligence is not available on your Mac, or if you already run a local OpenAI-compatible server.
### LM Studio
Open **LM Studio**, enable **Power User Mode**, then open the **Developer** tab.
Record a short sentence, then use a mode that applies AI processing, such as cleanup, summary, or writing help.
**What to expect:** New AI improvements use Apple Intelligence, so no paid AI API key is required. Apple Intelligence runs many requests on-device and can use Private Cloud Compute for more complex requests.
**If that did not work:** Check that Apple Intelligence is turned on in **System Settings > Apple Intelligence & Siri**, confirm your Mac and language are supported, then restart Utter and select **Apple Intelligence** again.
Apple Intelligence is the fastest setup because it does not require installing LM Studio, Ollama, or a separate local server.
## Advanced Fallback: Use LM Studio or Ollama
Use this path only if Apple Intelligence is not available on your Mac, or if you already run a local OpenAI-compatible server.
### LM Studio
Open **LM Studio**, enable **Power User Mode**, then open the **Developer** tab.
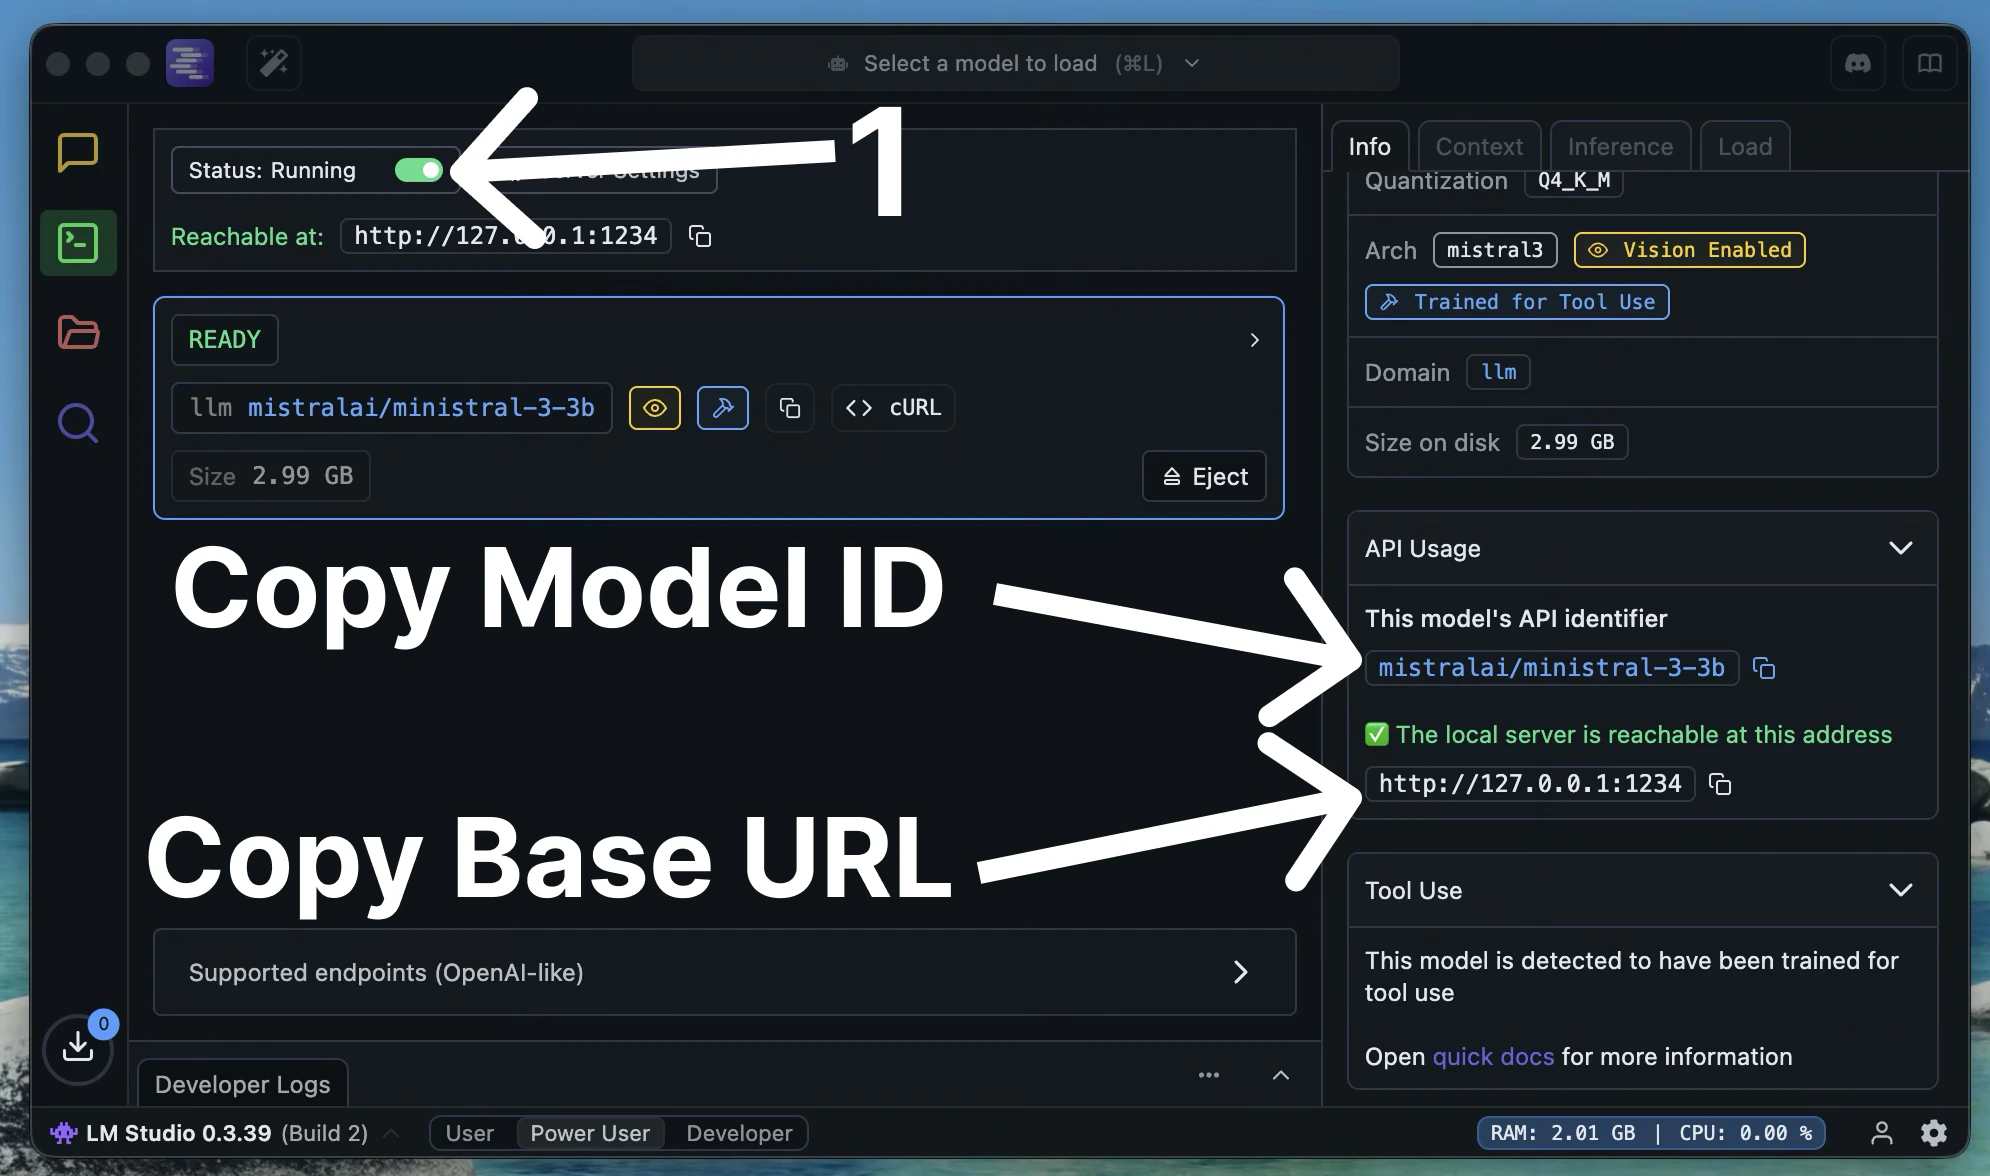
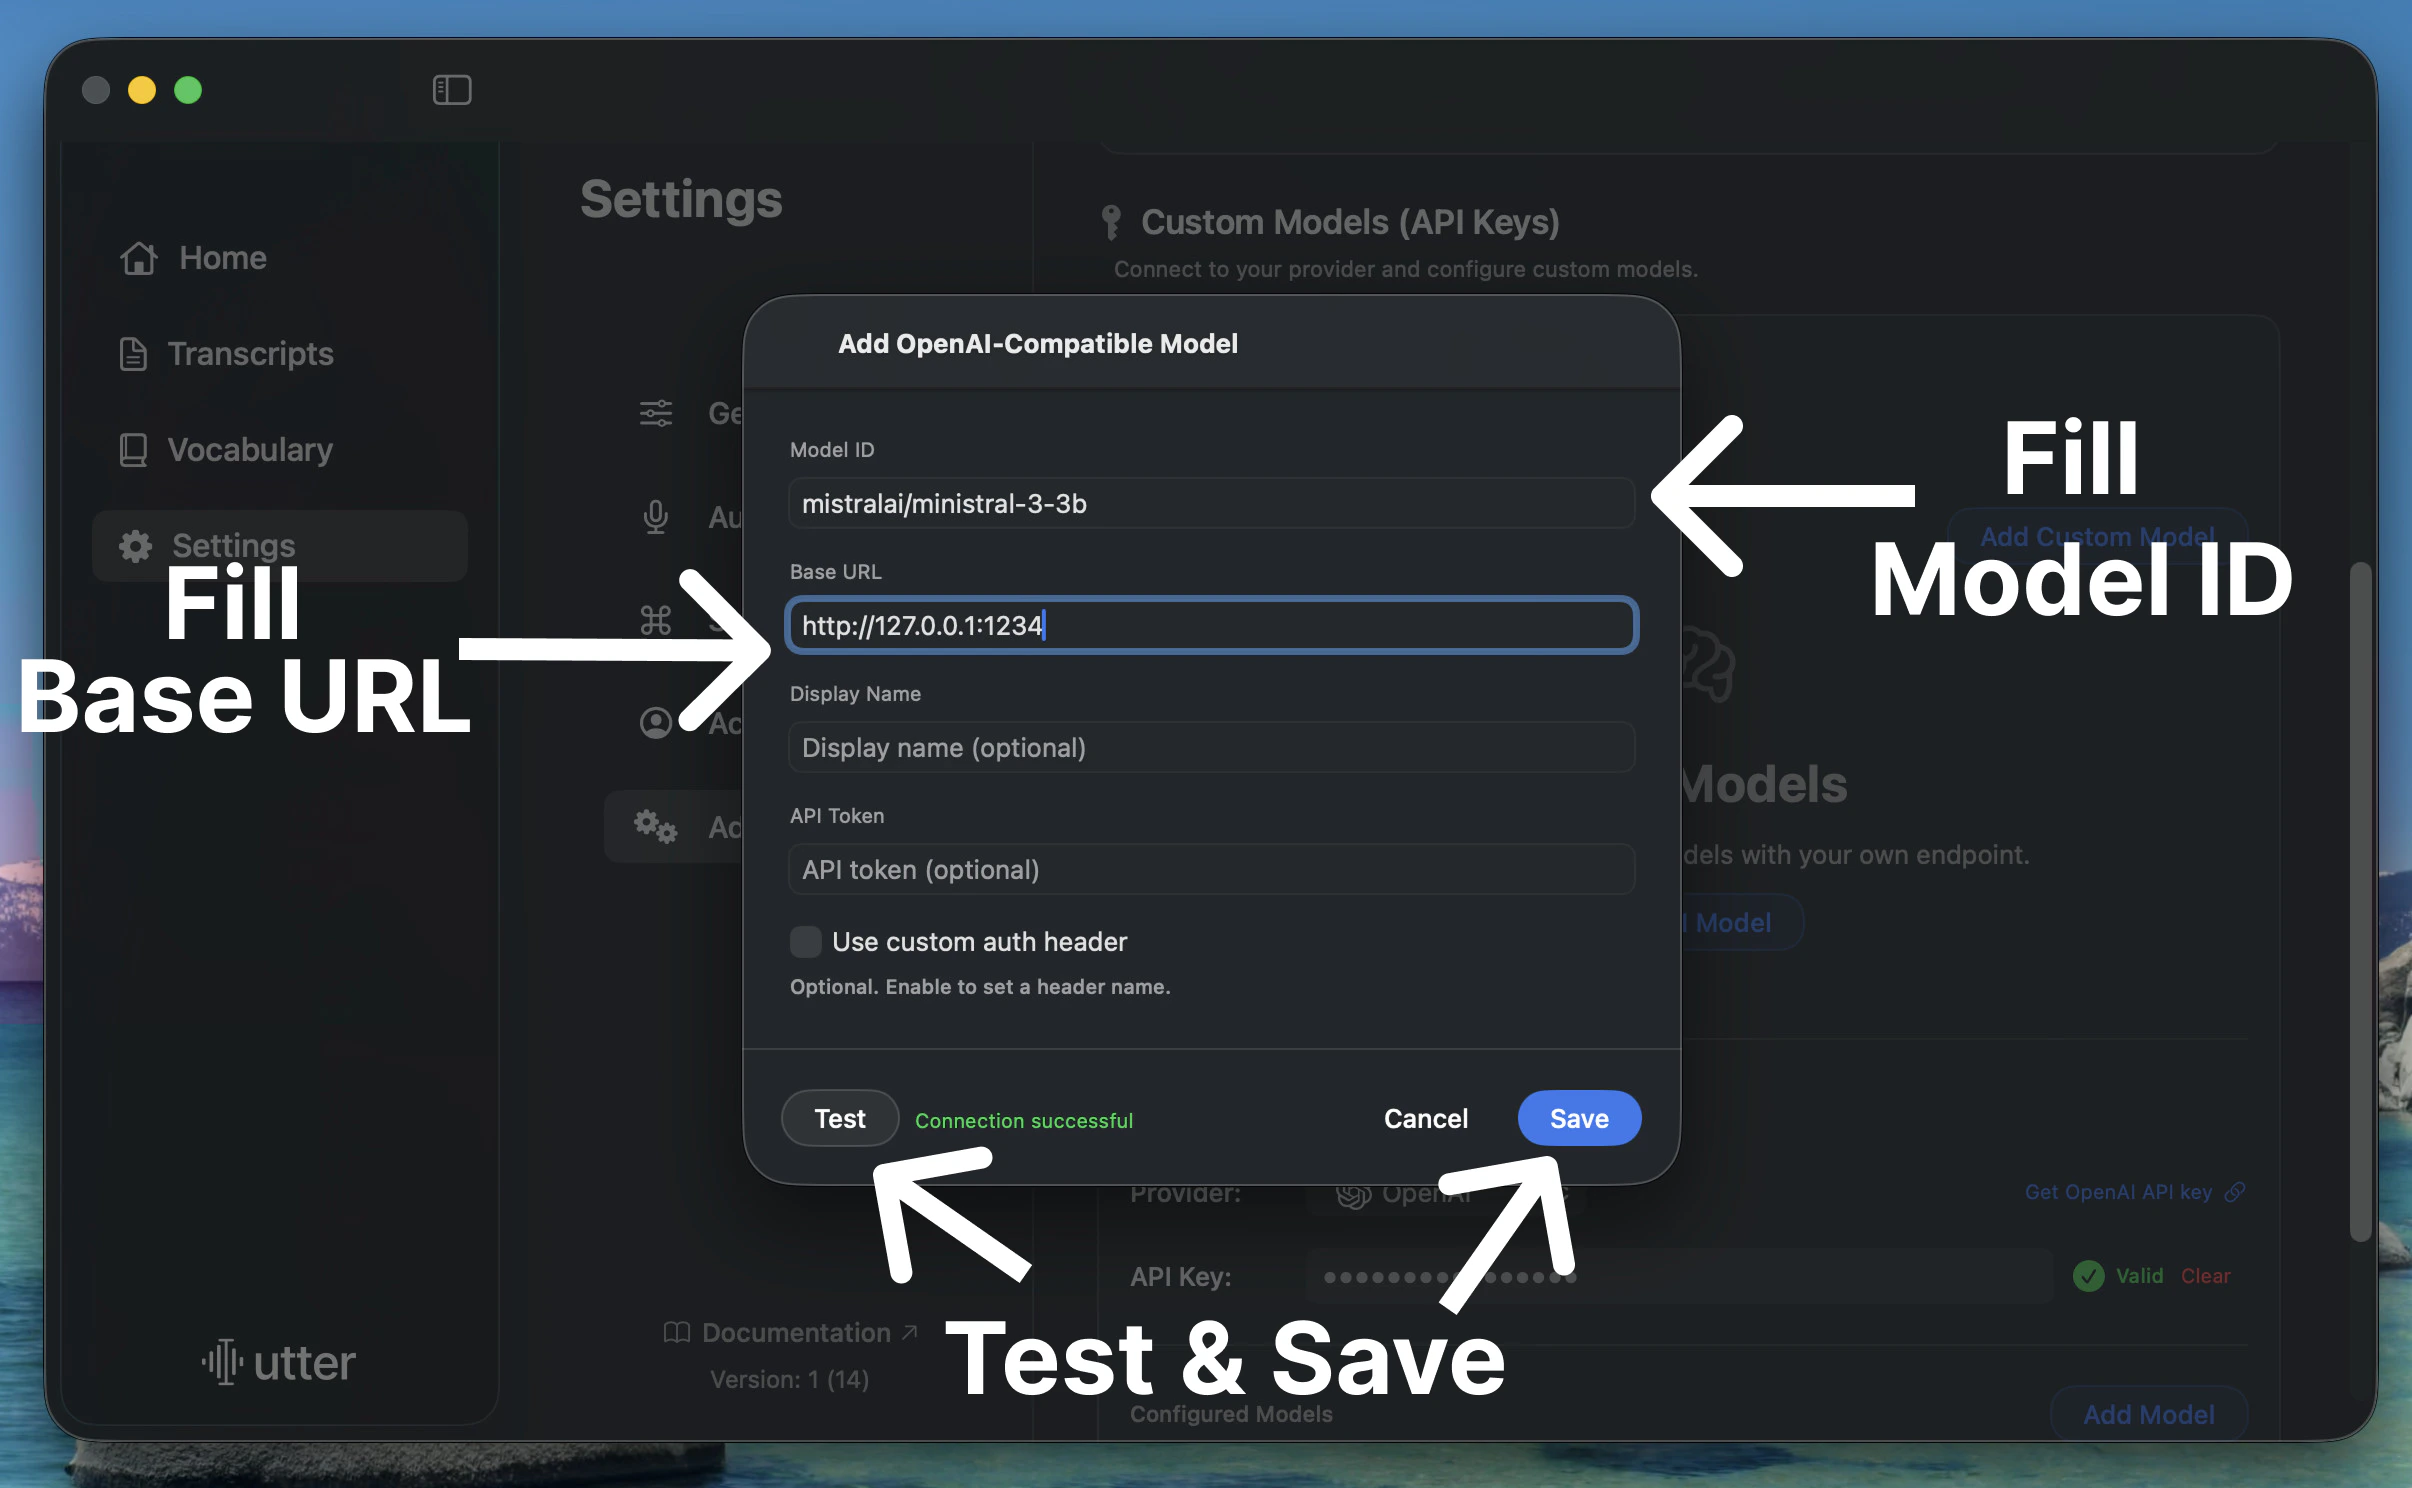
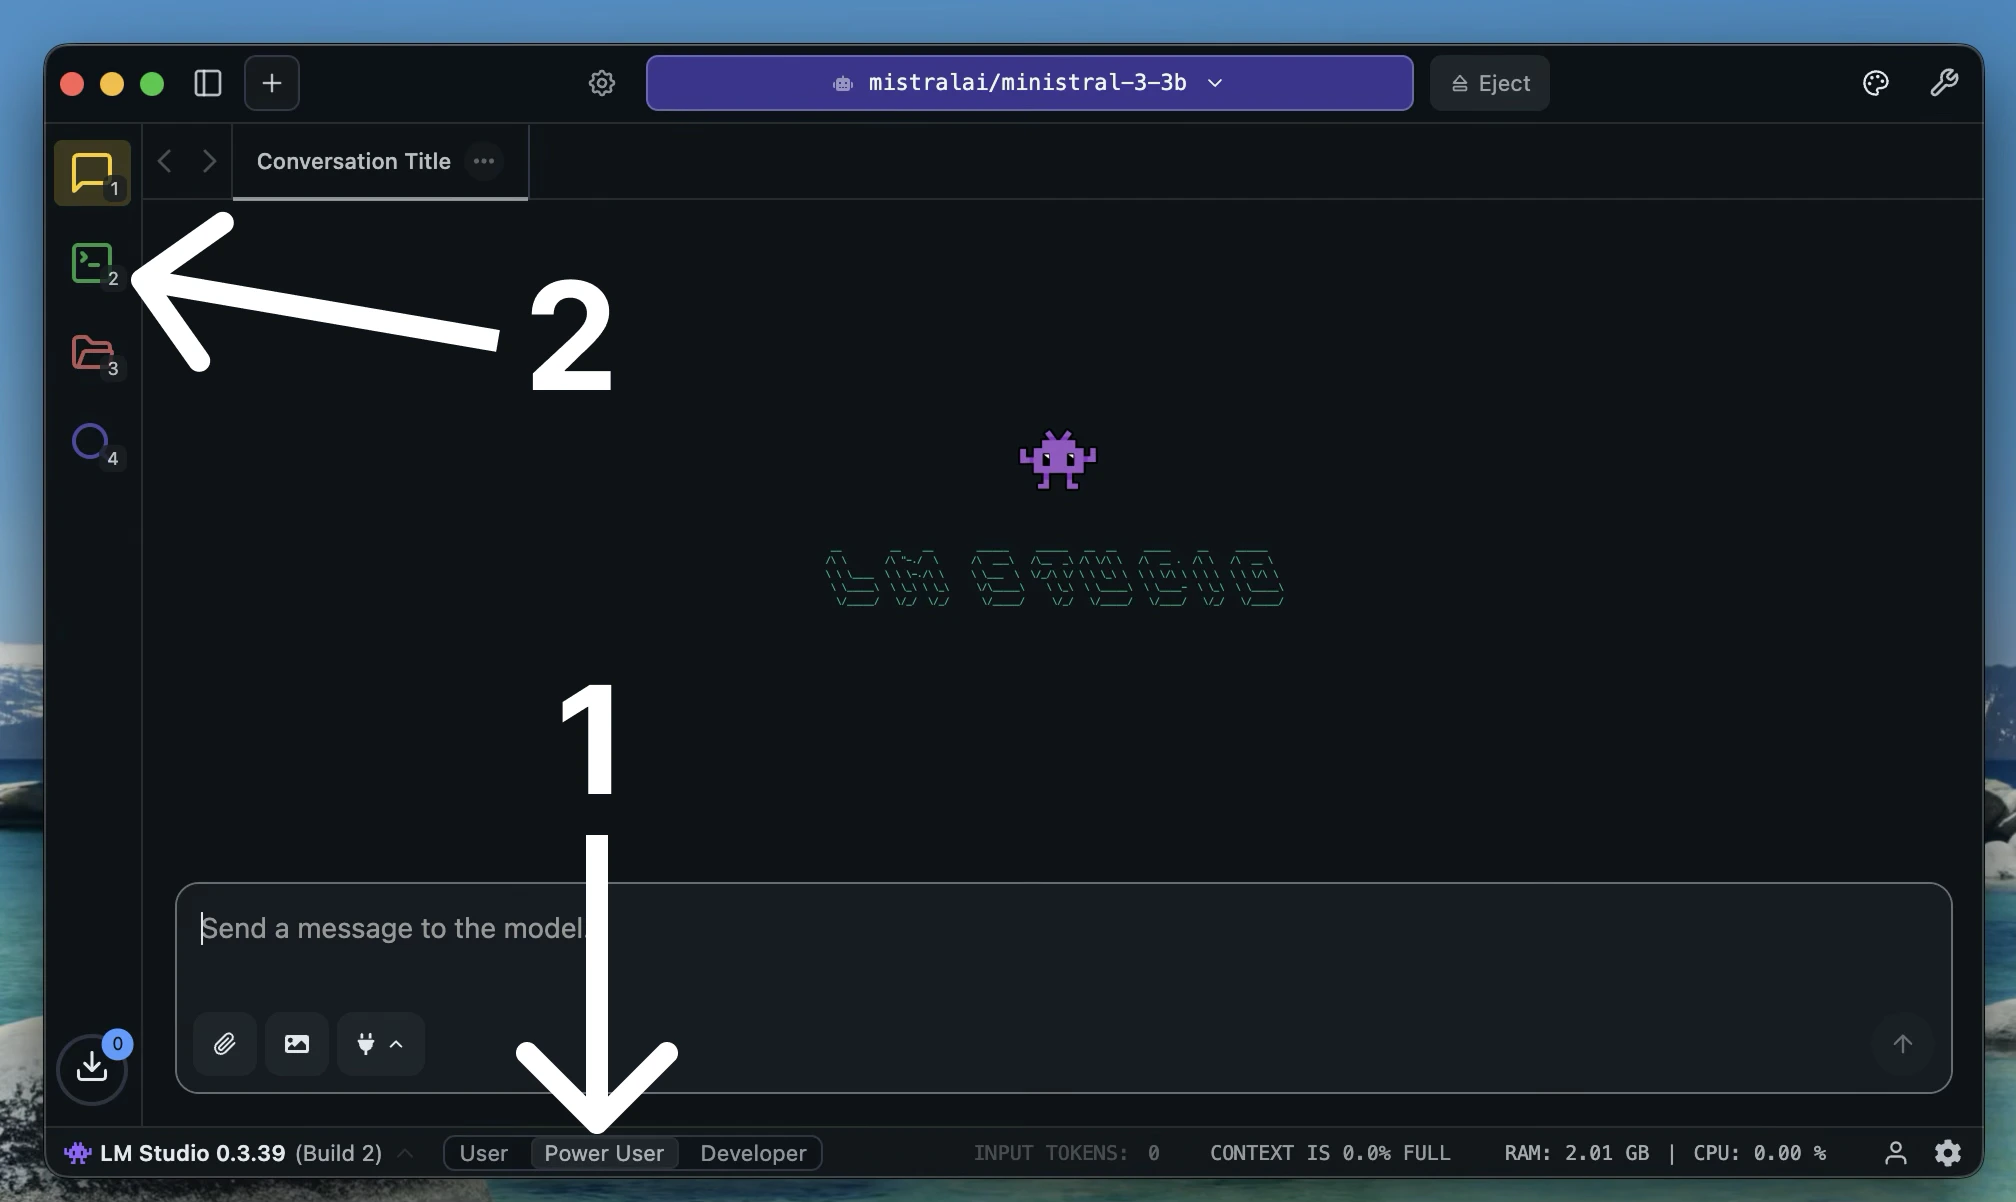 Make sure a model is loaded, enable the server, then copy the **Model ID** and **Base URL** from the Developer tab.
 In Utter, go to **Settings > Advanced > Custom Models**, then choose **Custom OpenAI Compatible** as the provider.
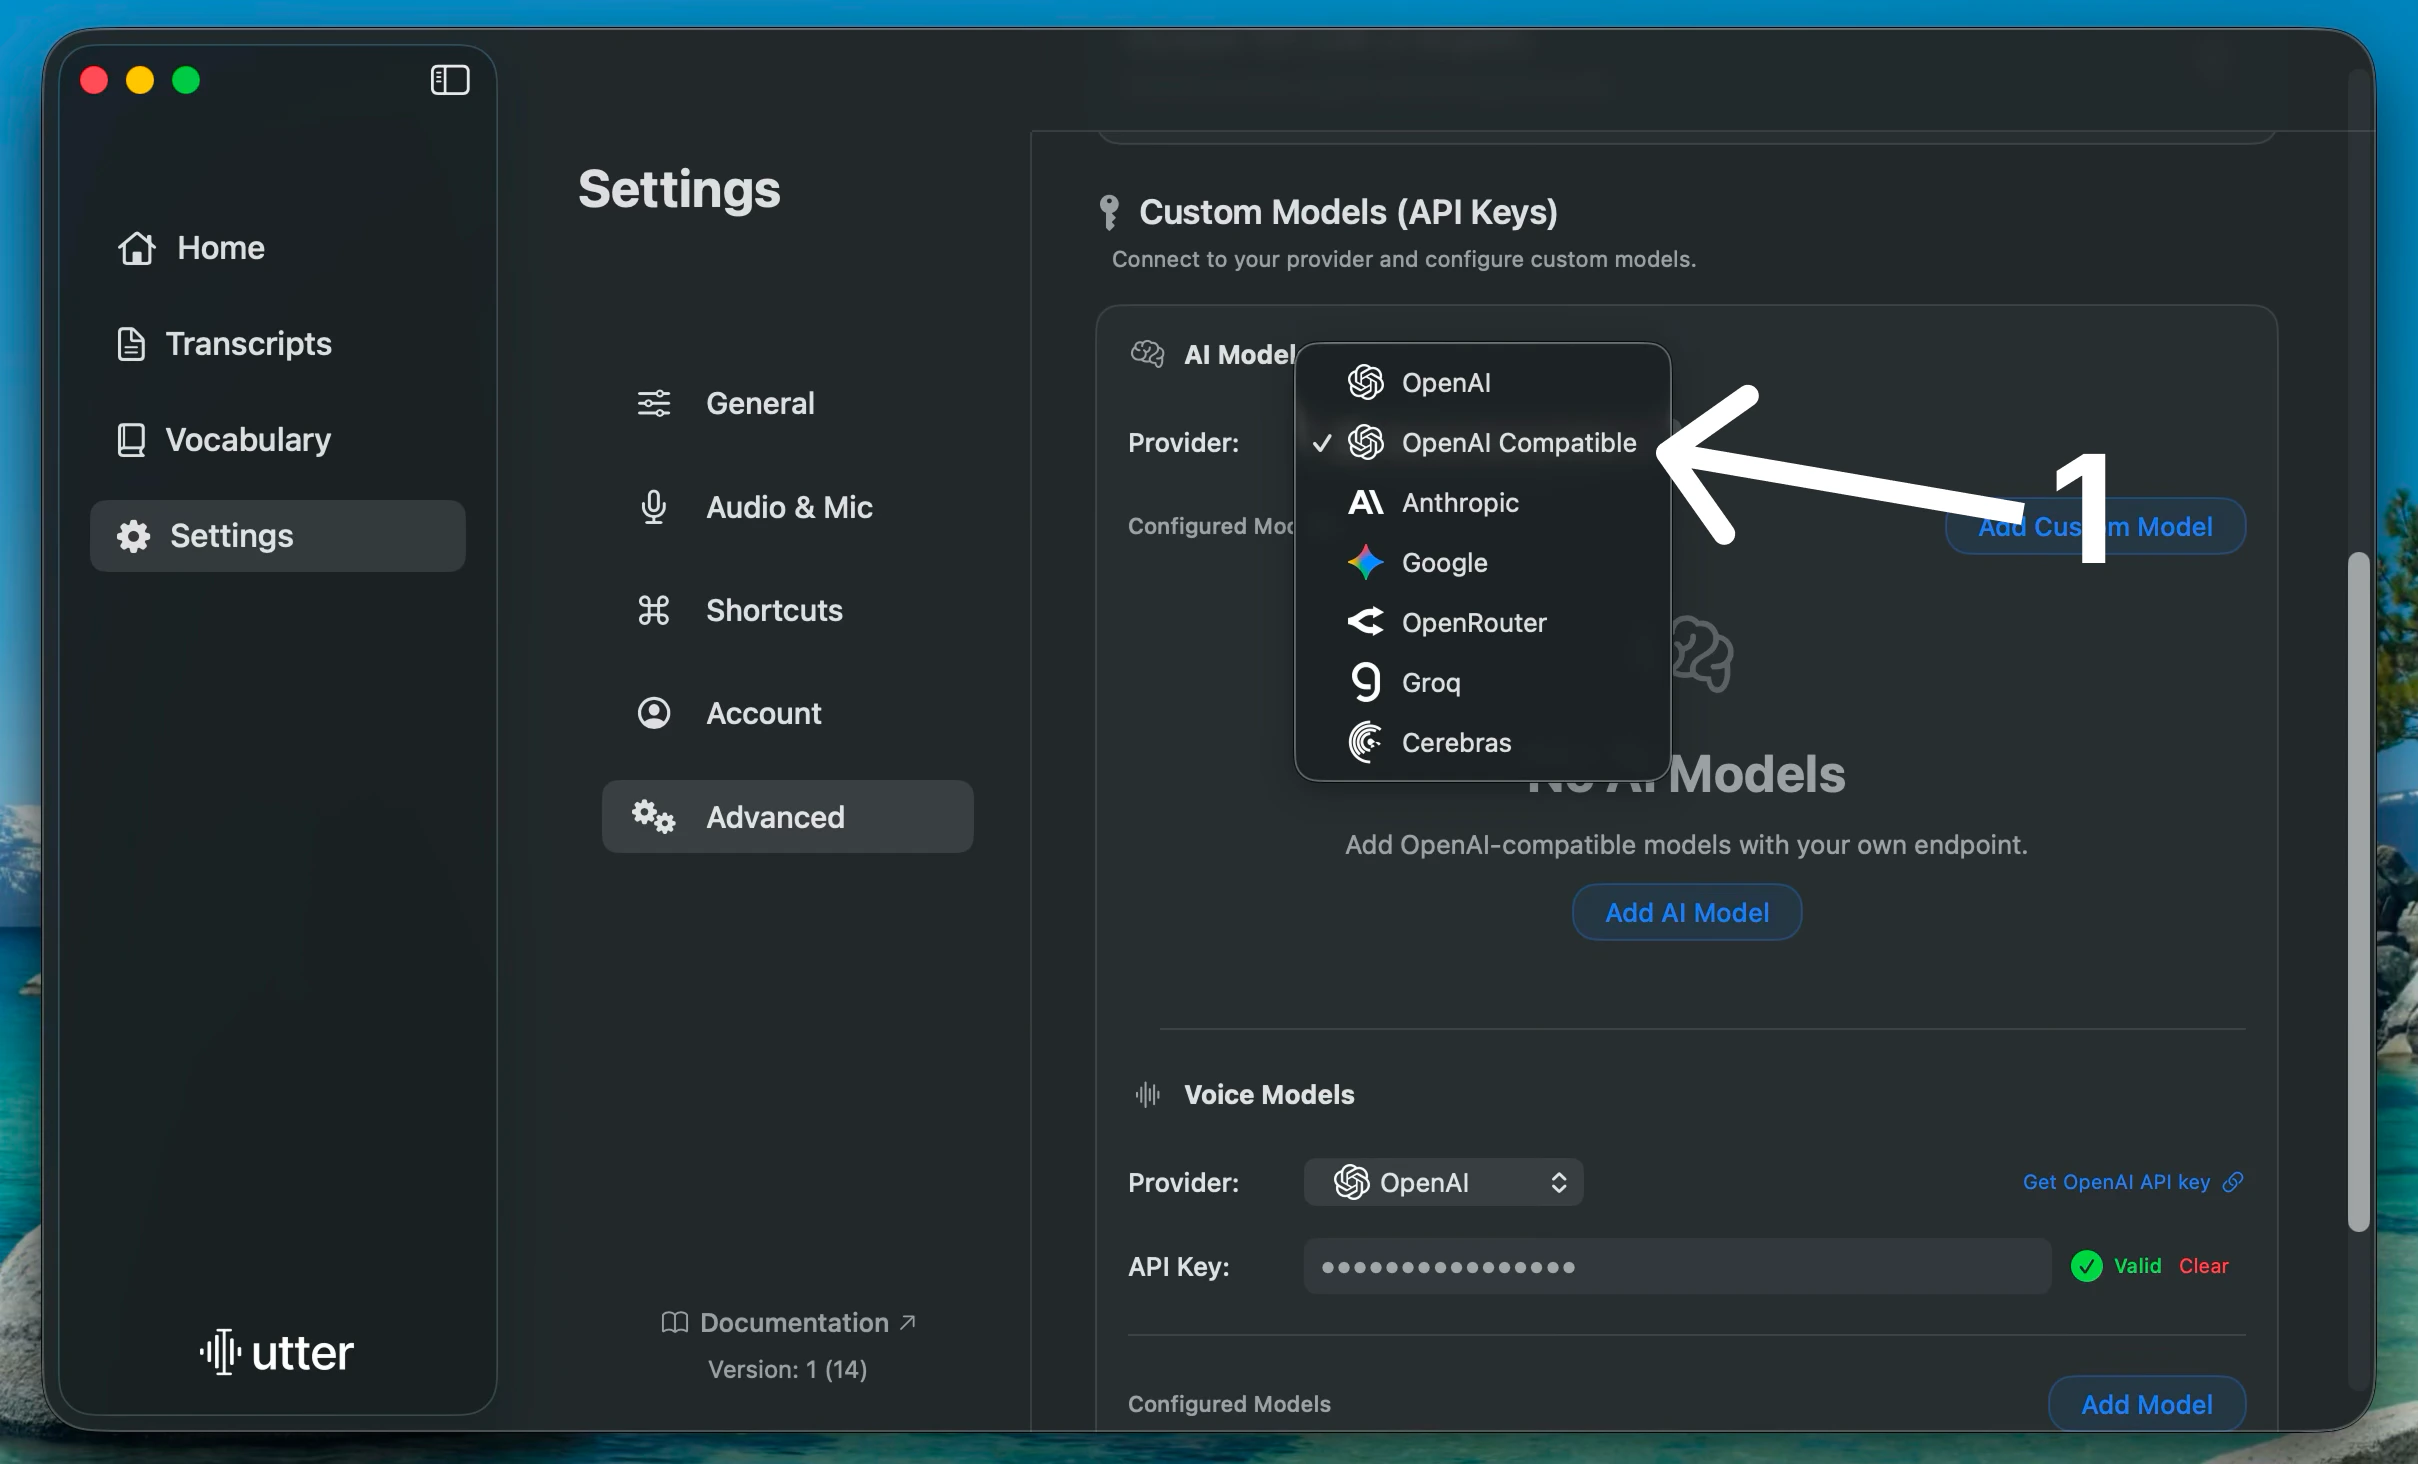 Click **Add Custom Model**. Paste the **Model ID** and **Base URL**, then click **Test** to verify the connection and **Save**.
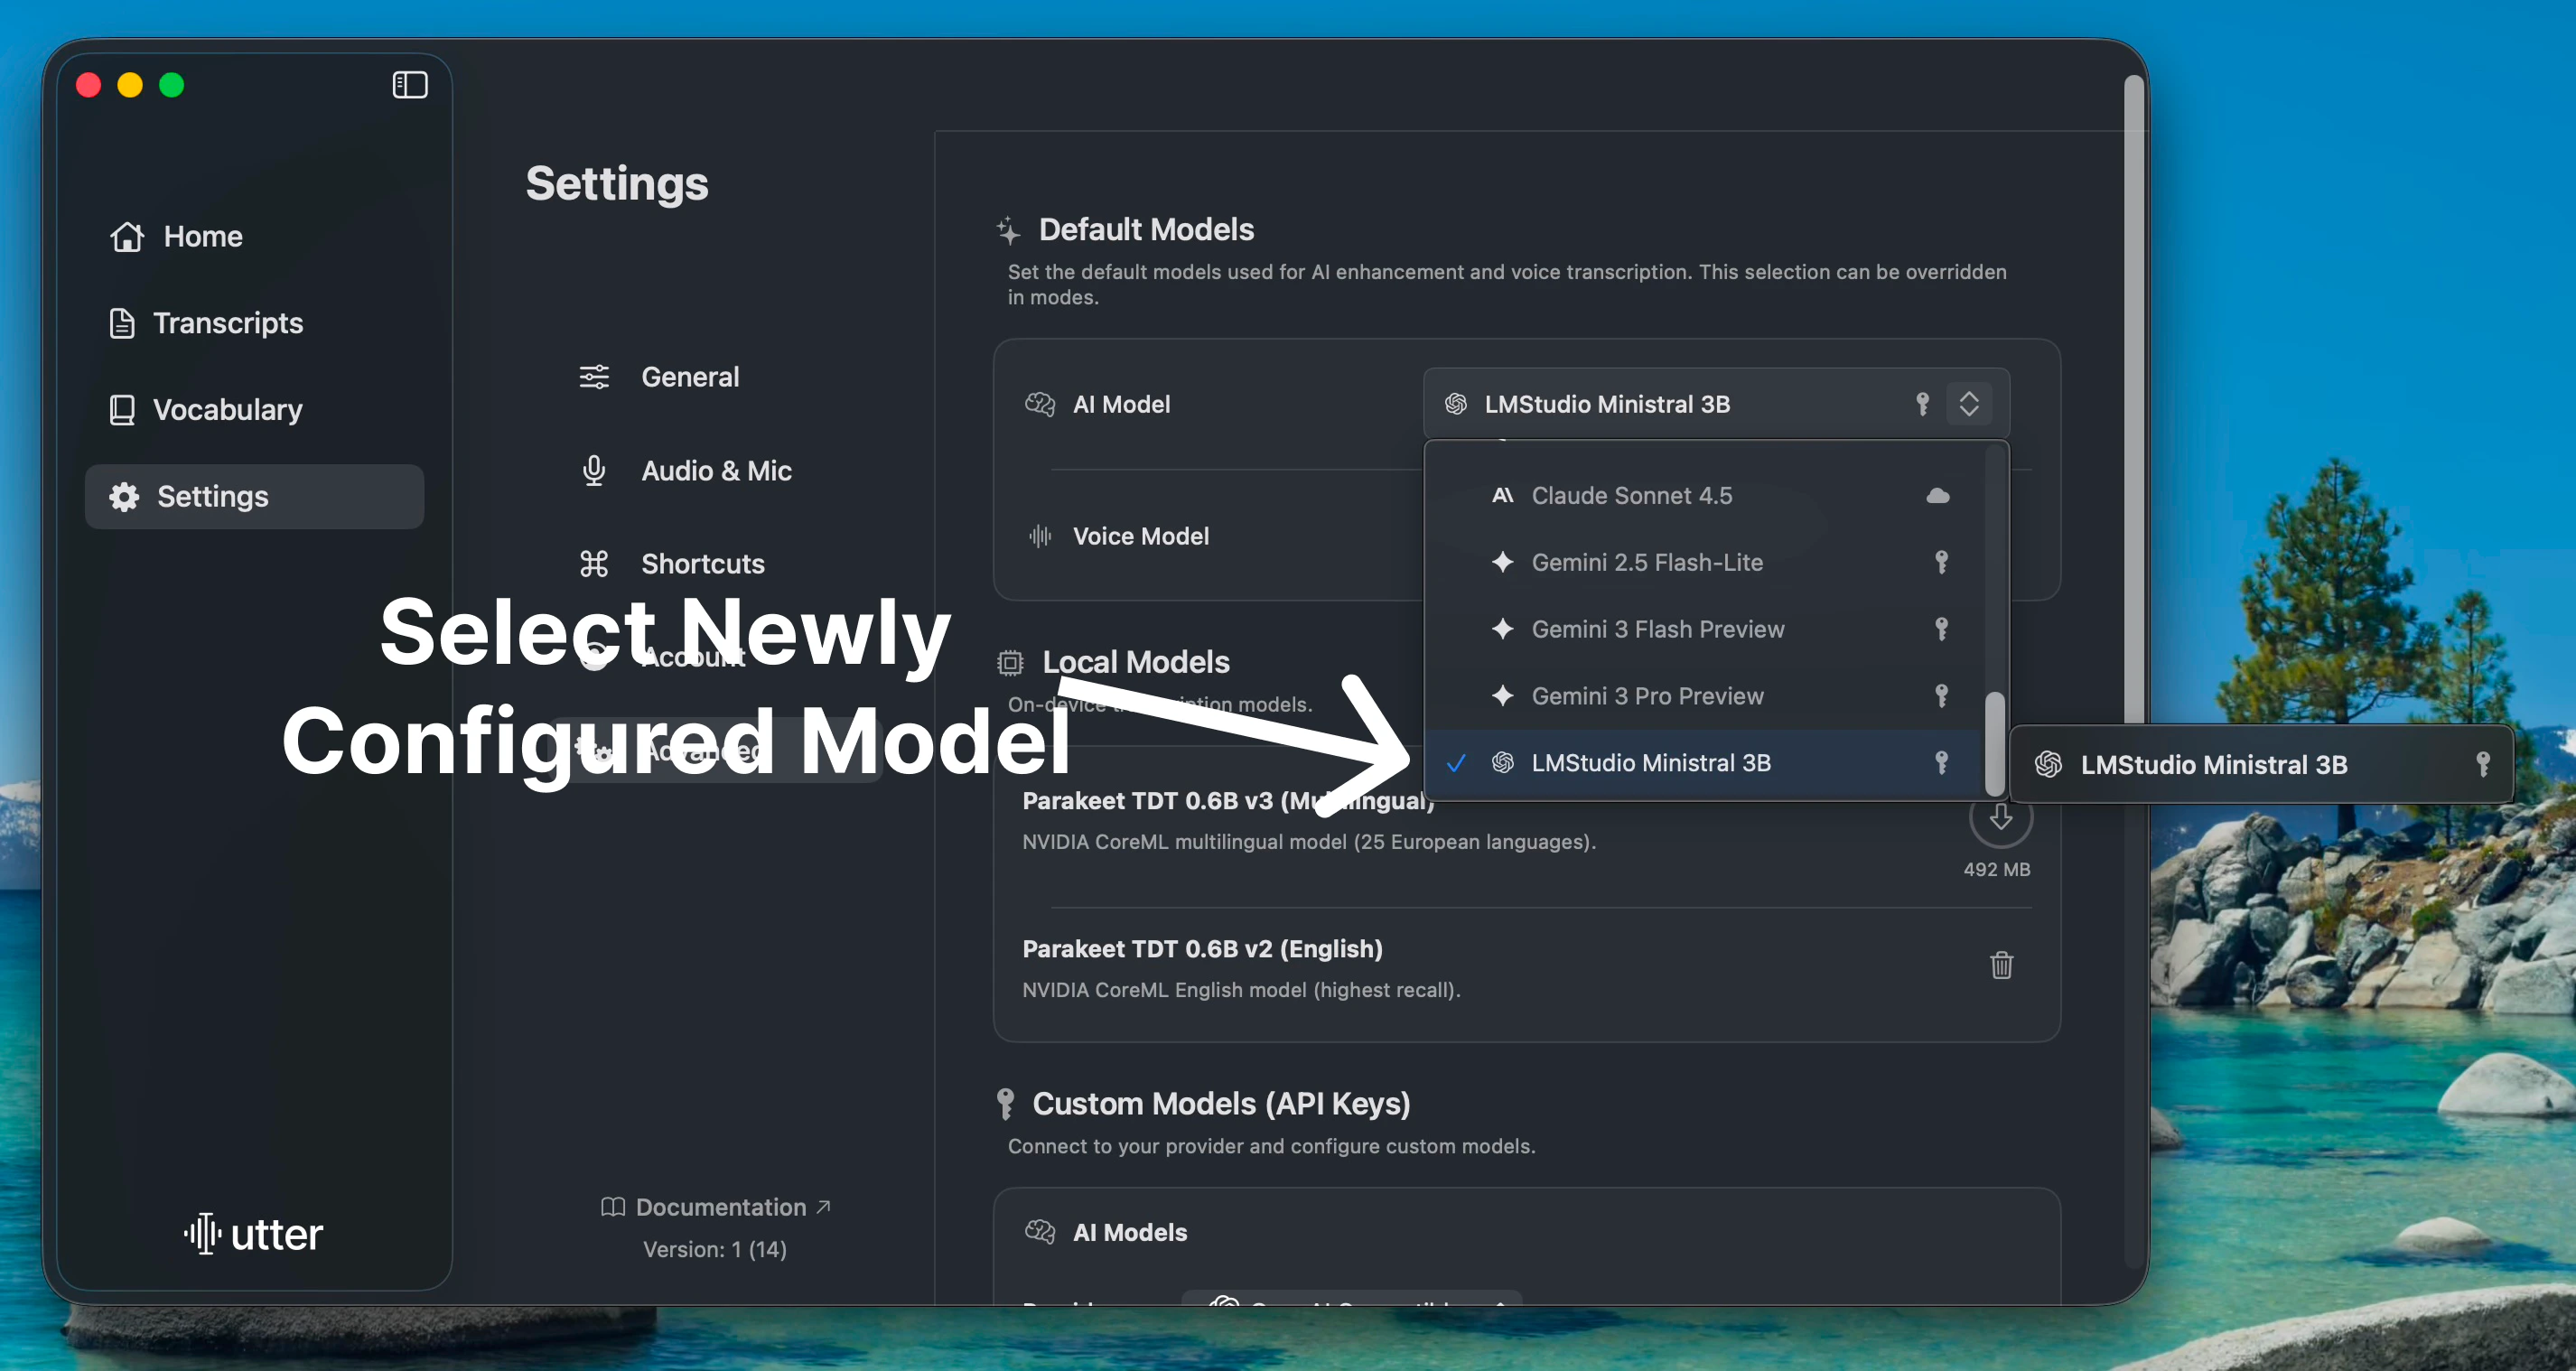
 In **Default Models** for AI models, select the newly created model (it has a **key icon**). This makes it the default for all AI post-processing.
 **What to expect:** AI output uses your local model, no external AI provider is required, and usage is unlimited unless you set limits in your local model app.
**If that did not work:** Click **Test** in the custom model form again, verify the local server URL and model ID, then save and reselect the model.
### Ollama
If you already use **Ollama**, configure it as an OpenAI-compatible provider and follow the same **Custom Models** steps above. The key requirement is a local server URL and a model ID exposed by your Ollama setup.
## Related
Connect your own model providers and API keys.
Set up free AI models for Utter.
## Still Need Help?
If Apple Intelligence does not appear in the model picker, contact support and include your Mac model, macOS version, and whether Apple Intelligence is enabled in System Settings.
**What to expect:** AI output uses your local model, no external AI provider is required, and usage is unlimited unless you set limits in your local model app.
**If that did not work:** Click **Test** in the custom model form again, verify the local server URL and model ID, then save and reselect the model.
### Ollama
If you already use **Ollama**, configure it as an OpenAI-compatible provider and follow the same **Custom Models** steps above. The key requirement is a local server URL and a model ID exposed by your Ollama setup.
## Related
Connect your own model providers and API keys.
Set up free AI models for Utter.
## Still Need Help?
If Apple Intelligence does not appear in the model picker, contact support and include your Mac model, macOS version, and whether Apple Intelligence is enabled in System Settings.